Shred a Scarecrow

 Farmers work very hard planting and harvesting their
crops. The scarecrow is an important "farm hand" whose job is to stand in the
garden and frighten away birds which might eat the fruit, vegetables, and grain
before they're harvested. People all over the world rely on the figures to keep
their crops safe.
Scarecrows have a long history, dating back to the ancient Romans and
Greeks who carved wooden statues of their harvest gods to stand guard in the
fields. Germans created wooden witches for the same purpose, and they believed
that the figures had special powers to draw the "evil spirit of winter" into
their bodies so that spring would come. People in Japan protected their rice
paddies with scarecrows made of oily rags and fish bones attached to tall
sticks.
As you can see, scarecrows are created from whatever the farmer has
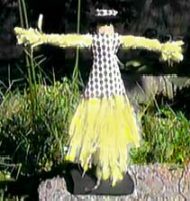
on hand. In America the figure is usually made of some old clothes and a hat,
and the stuffing is straw or hay. It's possible to make a small version of a
scarecrow from some common materials. We'll use scraps of cloth and paper for
the clothing and hat, and we'll shred yellow pages from a discarded telephone
book to look like the straw. Recycling these materials will help save natural
resources, energy, and landfill space.
You Will Need:
- Two straight sticks or dowel rods-about 3/8" in diameter x 8" and
3/8" in diameter x12"
- Shredded yellow pages
- Scrap construction paper and fabric
- Fine wire like telephone or florist's wire
- White glue
- Scissors
- Block of wood for a base
- Acrylic paint
- Newspapers on which to paint
- #7 or #8 Paint brush and pan
- Hot glue gun and sticks
- Electric drill
How to:
Paint the base before starting to make the scarecrow. By the time you
finish the figure, the base will be dry and ready to assemble. Wash the brush
when finished, because acrylic paint which dries in brushes can ruin them.
Make the
Arms
- Gather some shredded pages together into a
bunch measuring about 1/2" in diameter.
- Hold the bunch in the palm of your hand, and pinch the ends
together. Place the shorter stick on top.
- Lay another bunch of paper about the same size in diameter on top
of the stick, and hold in place.
- Fasten the paper to the stick at the scarecrow's wrist by tightly
wrapping it with a 3"-4" piece of wire.
- Gather the loose paper around the other end. Holding the ends of
the stick, carefully twist the shredded paper around it. Fasten tightly with
wire at the other wrist.
- Cut off the extra wire. Trim the paper ends, and snip it to make
finer.
Make the Body and Head
- Again, gather some shredded pages together into a bunch measuring
about 1/2" in diameter.
- Hold the bunch in one hand as before, and pinch the ends together.
Place the other stick on top.
- Lay another bunch of paper about the same size in diameter on top
of the stick, and hold in place.
- Fasten the paper to the stick by tightly wrapping it at the top
with a 3"-4" piece of wire.
- To make the face, wire the paper about 1" below the top. Decorate
later with scrap paper.
- Lay the arms across the longer stick just below the face.
- Place a long piece of wire diagonally under the cross pieces where
the arms meet the body.
- Bring the ends together, and twist tightly in the center.
- Take the ends to the back over the remaining sticks, making an "X"
with the wire on the front. Fasten tightly at the back and reinforce, if
necessary. Cut off the extra wire.
- Wrap wire a short distance below the cross pieces to form a waist.
Design the Clothing

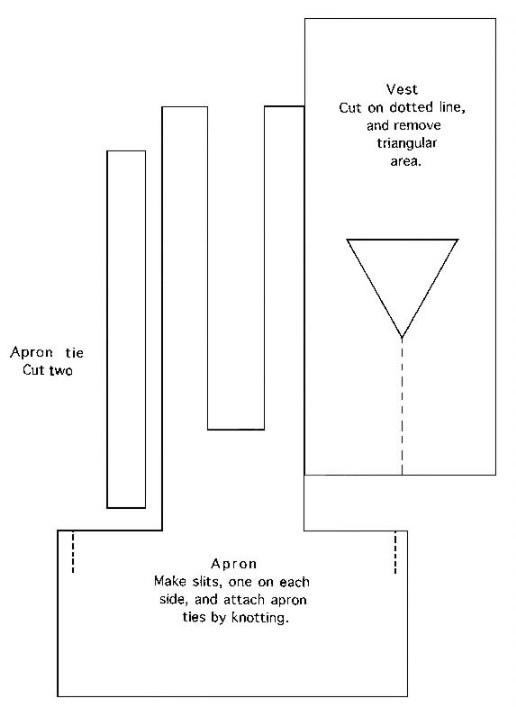
- For a female scarecrow, trace the apron pattern, cut it out, and
dress the figure.
- For a male scarecrow, divide the remaining shredded paper in half
to form two legs. Wrap the wire tightly around each ankle. Trace the vest
pattern, and cut out. Make an opening for the figure's head. Cut the front as
shown, and dress the scarecrow.
Make the Hat

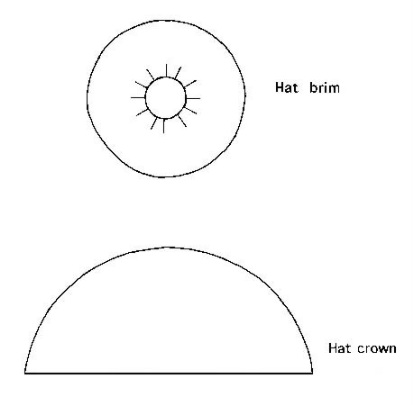
- Trace the patterns for the hat brim and crown, and cut them out.
- Working with the hat brim, cut out the circle on the inside. Now
make short cuts all around the inside of the small circle, forming tabs.
- Put glue on the underside of each tab, and place it on the
scarecrow's head.
- The top of the hat is made from a cone. Hold the paper with the
straight side up, and fold one side over the other, folding toward yourself.
- Adjust the size of the cone to fit the figure's head, and then
glue it shut.
- Snip off the top 3/4" of the cone, and then partially collapse it
by gently pushing paper down and into the center.
- Glue the cone to the brim, and decorate the hat with scrap paper.
These are just a few ideas of how to dress the scarecrow. Try to
create some designs of your own!
Assemble
- Drill a hole slightly smaller than the stick or dowel in the scrap
wood. Use a hot glue gun to fasten the scarecrow to the base.
Tips and Tricks:
- Paper shredders are great tools to get perfect and exact strips every time.
- If you don't have a paper shredder, just cut the paper into fine
strips with scissors, or have an adult cut the paper for you using a utility
knife or a paper cutter.
- Another option to using a base is to attach a wire at the back,
and display the figure by hanging it on a wall or door. This will eliminate the
need for the wood, glue gun, and drill.
- Substitute a scrap of felt for paper in making the hat, and use
fabric glue to make the pieces stick together.
- The most famous scarecrow of all is one you've probably seen many
times in the movie entitled "The Wizard of Oz."
When working with telephone wire,
please take the following safety precautions:
- Wear disposable gloves
- Never put the material in your mouth.
- Don't leave the wire in direct sunlight.
© 1998 Marilyn J. Brackney updated (2018)
Volume 14 No. 1 revised 2010

Return to Main Web Page
Previous
Activities
Select this to choose other activities.

![]() Farmers work very hard planting and harvesting their
crops. The scarecrow is an important "farm hand" whose job is to stand in the
garden and frighten away birds which might eat the fruit, vegetables, and grain
before they're harvested. People all over the world rely on the figures to keep
their crops safe.
Farmers work very hard planting and harvesting their
crops. The scarecrow is an important "farm hand" whose job is to stand in the
garden and frighten away birds which might eat the fruit, vegetables, and grain
before they're harvested. People all over the world rely on the figures to keep
their crops safe.