Make Your Own Trashasaurus Rex Sculpture
![]()
![]()
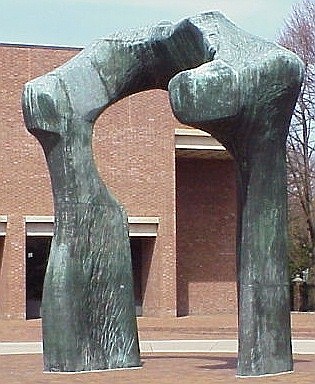
We've already learned that the main difference between drawing and sculpture is one of dimension. While you can draw a picture so that objects appear to look three-dimensional, the surface on which you work is flat. Sculpture, however, has depth as well as length and width. The two kinds of sculpture are relief and in the round. Details project or stick out from a background in a relief sculpture, so they can be seen only from the front and sides. Figures on architecture, such as those found on the Arc de Triomphe in Paris, are good examples of this type. An in the round sculpture is free-standing, however, so it can be viewed from all sides. Henry Moore's Large Arch, which is located here in Columbus, is an example of an in the round sculpture.
Trashasaurus Rex, our solid waste sculpture, was created in response to a 1990 ruling handed down by a United States District Court. The judge in the case ruled that the State of Indiana couldn't prohibit other states from transporting solid waste and depositing it in our landfills. Even though many of our landfills were at or near capacity, the judge said that banning out-of-state trash would be unconstitutional, since the law would interfere with interstate commerce. The ruling inspired us to create Trashasaurus in order to increase awareness of the solid waste problem and to encourage recycling. During the past four years, the dinosaur has appeared at many environmental functions, including the first Kids' World Conference on the Environment sponsored by Nickelodeon, the children's television network based in Orlando, Florida.
Just as folk artists work with whatever they have on hand to make art, you can use found materials to create a sculpture like Trashasaurus Rex and express how you feel about the solid waste problem. Creating such a sculpture will help save landfill space, and displaying your work in a public place can make others aware of the solid waste problem.
You will need:For a sculpture in the round:
For a relief sculpture:
|
The following is a general description of how we made our solid waste sculpture, Trashasaurus Rex. You can use our suggestions to build a dinosaur or another animal of your own creation.
Before any building was done, we began our work by studying the sizes and general shapes of dinosaurs. We concluded that a simple, four-legged creature with its feet planted firmly on the ground would give the support and stability needed to withstand the possible moving and the weight of objects to be glued to it. We decided on an Apatosaurus (formerly called Brontosaurus), figured the size of our dinosaur in proportion to a real one, and made a drawing of its general shape.
When it was time to build the dinosaur, we moved our project to the garage. Using our drawing as a guide, we constructed a stick figure with lumber and nails. We connected the front legs to the back legs with a long piece of wood in the center of the body. To this we attached a large piece of scrap wood which was curved on top to help round out and support the creature's back. Next we created the dinosaur's form with chicken wire, a type of wire used to make cages. This wire was very flexible, making it easy to cut and shape the head and body around the stick figure.
![]()
We braced the creature's legs with metal dryer duct pipe, and gave it even more support by recycling some old boots for its feet! The long, rigid neck and head were made of clothes dryer venting filled with a self-expanding foam. All of these pieces were wired to each other to make the dinosaur. We made a base for the sculpture by constructing a simple, wooden box. The dinosaur's feet were bolted to the base, and we attached furniture casters or rollers to the box to make moving the sculpture easier.
After building the basic structure, a hole about nine inches in diameter was cut in the wire side of the dinosaur's body, and it was stuffed solidly to make it more stable and to help give it some weight. Hundreds of plastic grocery and dry cleaning bags as well as polystyrene peanuts and trays were used as filler. We left the hole or opening permanently exposed, so others could see what was inside our finished sculpture. Dryer hose was used for the tail. After stuffing it with crumpled newspapers, we curled the tail inward and wired it to one of the dinosaur's back legs to keep it in place.
On Earth Day of 1992, some of my students helped apply the first two
layers of papier mache. Nathan, Ethan, David, Sarah, and Katie, pictured here,
![]() used
wallpaper paste and sheets of newspaper to cover the entire dinosaur framework.
I added four more layers, and for the next several weeks, I collected and saved
solid waste to glue on the dinosaur. Then the fun began-gluing on the
trash!
used
wallpaper paste and sheets of newspaper to cover the entire dinosaur framework.
I added four more layers, and for the next several weeks, I collected and saved
solid waste to glue on the dinosaur. Then the fun began-gluing on the
trash!
When warm weather came, we moved the dinosaur outside on our driveway. We painted the eyes and teeth with acrylic paints, and we continued gluing trash onto the body as well as the base. Soon neighbors and strangers alike began stopping by to bring us trash to glue on the creature! A broken toy, an odd glove or sock, one earring! Sometimes people would stop just to see how we were progressing. Finally, after many, many hours of gluing, Trashasaurus was finished!
Rather than building a sculpture in the round, you may want to create a relief sculpture. This type will take less time to make, require a much smaller working area, and the basic building materials will be easier to obtain.
First, decide the subject of your sculpture. Make a preliminary drawing or plan on paper, and decide how big the finished relief sculpure will be. You'll need a large scrap of cardboard on which to draw the outline or shape of the sculpture.
Go to an appliance store, and ask the manager to save a carton for you. After unpacking refrigerators and other large appliances, the cartons are usually discarded. Tell your friends and neighbors about your project, and ask their help as you begin collecting solid waste for your sculpture.
When you're ready to begin, cut the carton down to a manageable size. Using your original plan as a guide, draw the outline or shape of the sculpture. Use white glue or carpenter's glue to adhere or stick trash onto the cardboard, being careful to follow the outline and fill it in solidly. If you wish, finish the piece by painting the background. Display the sculpture by hanging it or standing it against a wall.
It's necessary to apply many layers of papier mache in order to make a sculpture in the round sturdy. But how do you keep track of the layers, so that you know which layer you're working on? Here's an easy way. Just use two kinds of newspapers, the black and white or news part of the paper and the colored comic section. As you glue the layers, alternate one kind of paper with the other. In other words, after a black and white layer, apply a comic page layer, then a black and white layer, and so on. Continue alternating layers until you're finished with the papier mache.
![]() While you can work as a member of a group on this project, you can
create a sculpture by yourself, if you prefer. Just make a much smaller version
of Trashasaurus Rex or some other subject. Wire coat hangers together or tape
small wooden sticks to make the basic form. Shape the outline of the dinosaur
with wadded newspaper and tape it to its skeleton. Then add at least three or
four layers of papier mache to make the sculpture sturdy. Collect solid waste
which is in proportion to this smaller sculpture, and glue it to the framework,
being careful to preserve the dinosaur's shape or outline. Similarly, scale
down a relief sculpture so you can work on it at your desk. See
America the Beautiful? for a suggestion on
a subject to use for a relief sculpture.
While you can work as a member of a group on this project, you can
create a sculpture by yourself, if you prefer. Just make a much smaller version
of Trashasaurus Rex or some other subject. Wire coat hangers together or tape
small wooden sticks to make the basic form. Shape the outline of the dinosaur
with wadded newspaper and tape it to its skeleton. Then add at least three or
four layers of papier mache to make the sculpture sturdy. Collect solid waste
which is in proportion to this smaller sculpture, and glue it to the framework,
being careful to preserve the dinosaur's shape or outline. Similarly, scale
down a relief sculpture so you can work on it at your desk. See
America the Beautiful? for a suggestion on
a subject to use for a relief sculpture.
Help increase environmental awareness and encourage recycling by displaying your sculpture at school or some other public place such as a local shopping center or mall. Ask the manager to exhibit your work in conjunction with Earth Day which is always in April. It's fun for people viewing your solid waste sculpture to see what your artwork is made of, so include a list of the kinds and quantities of trash you were able to save from going to the landfill. Try to use mostly nonrecyclable solid waste in your sculpture, and take any recyclable materials such as paper, cans, and cardboard to your recycling center or drop-off site.
© 1996 Marilyn J. Brackney (updated 2018)
Volume 4 No. 1
Previous
Activities
Select this to choose other activities.
![]()